Mitsubishi Outlander: Split tailgate
WARNING:
● It is dangerous to drive with the tailgate (upper gate and lower gate) open, since
carbon monoxide (CO) gas can enter the cabin. You cannot see or smell CO. It can
cause unconsciousness and even death.
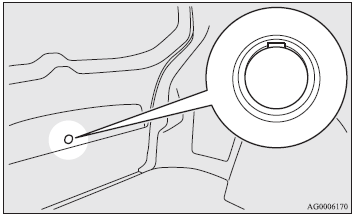
To lock or unlock from outside the vehicle
Vehicles without the keyless entry system and vehicles without the keyless operation system
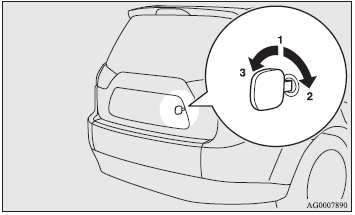
1- Insert (or remove) the key. 2- Lock. 3- Unlock.
To lock or unlock from inside the vehicle
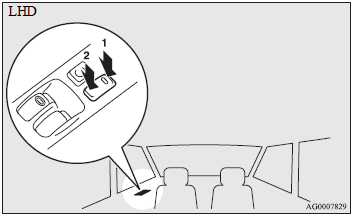
The tailgate can be locked or unlocked by using the central door lock switch (driver side).
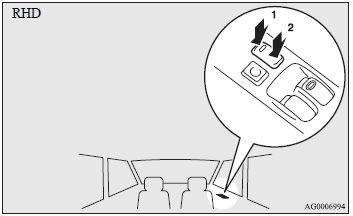
1- Lock. 2- Unlock.
NOTE:
● Repeated continuous operating between lock and unlock could cause the central
door locks’ built-in protection circuit to prevent the system from operating. If
this occurs, wait about one minute before operating the central door lock switch.
To open
1. After unlocking the tailgate, pull the handle and lift the upper gate.
2. Move the lever in the direction of the arrow and slowly fold down the lower gate.
CAUTION:
● If a trailer hitch member (device for towing a trailer) is mounted, do not open
the lower gate. Touching the trailer hitch could scratch the lower gate.
NOTE:
● Do not jump on to the lower gate or subject it to a strong impact. This could
damage the lower gate.
● If you do not open the tailgate immediately after pulling the handle, the tailgate
will automatically be relocked. If this happens, pull the handle again and lift
the tailgate with the handle still pulled.
● The tailgate cannot be opened when the battery is flat or disconnected. After
replacement of the battery, the tailgate will be in the locked position.
To close
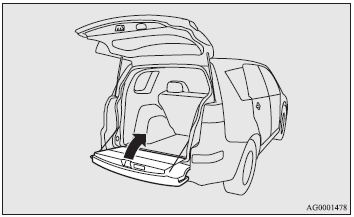
1. Raise the lower gate until it locks properly in position with a click.
NOTE:
● Before closing the upper gate, push and pull the lower gate to make sure it is
securely locked. You cannot close the upper gate unless the lower gate is properly
closed.
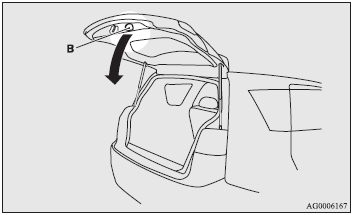
2. Pull the upper gate grip (B) downward as illustrated. Gently slam the upper gate from the outside so that it is completely closed. Always ensure the upper gate is securely closed.
CAUTION:
● When closing the upper gate, always ensure your or other person’s fingers cannot
be caught by the upper gate.
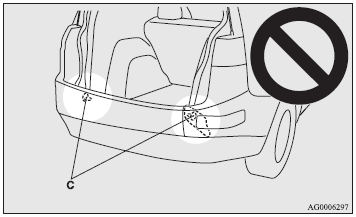
● When closing the lower gate, make sure there is no foreign matter around the striker
(C). Otherwise, the bar could be damaged and it could become impossible to close
the lower gate.
NOTE:
● Always close the lower gate before closing the upper gate. If you try to close
the gates in the reverse order, they could strike each other and be damaged.
● Gas struts (D) and wires (E) are installed to support the tailgate. To prevent
damage or faulty operation. • Do not hold the gas struts and wires when closing
the tailgate. • Also, do not push or pull the gas struts and wires. • Do not attach
any plastic material, tape, etc., to the gas struts and wires. • Do not tie string,
etc., around the gas struts and wires. • Do not hang any object on the gas struts
and wires.

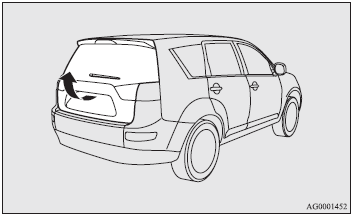
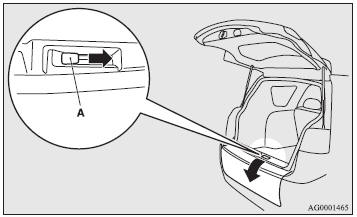
Inside tailgate release
The inside tailgate release is designed to provide a way to open the tailgate in the case of a discharged battery. The tailgate release lever (see illustration) is mounted on the tailgate.
You and your family should familiarise yourselves with the location and operation of the tailgate release lever.
To open
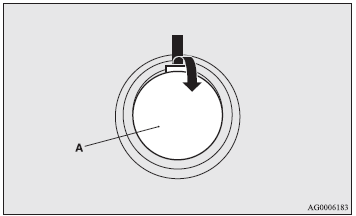
1. Open the lid (A) inside of the tailgate.
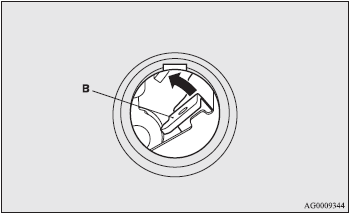
2. Move the lever (B) up to open the tailgate.
3. Push out on the upper gate to open it. 4. Slowly lower the lower gate.
CAUTION:
● Always keep the release lever lid on tailgate closed when driving so that your
cargo cannot accidentally bump the lever and open the tailgate.
 Dead Lock System*
See also:
Outside rear-view mirrors
To adjust the mirror position
The outside rear-view mirrors can be operated when the ignition switch is in
the “ON” or “ACC” position.
WARNING:
● Do not attempt to adjust the rear-view mirrors while driving. This can be dangerous. ...
Nissan customer care program
NISSAN CARES ...
Both NISSAN and your NISSAN dealer are dedicated to serving all your automotive needs. Your satisfaction with your vehicle and your NISSAN dealer are our primary concerns. Your NISSAN dealer is always available to assist you with ...
